I had all the skills broken down into bite-size pieces and structure laid out in a sensible way, but the agent would often improvise. When I pressed the agent why they weren’t following the skills, I would usually hear something like:
“The skills are clearly written, I just didn’t follow them well. I skimmed them, and then improvised. I should have done x, y, z. Should I redo it?”
The solution wasn’t to write clearer skills. It was to codify correctness so it was enforceable.
Backend Gates FTW
The failures were happening because there was no way for me to force the agent to follow the skills or redirect the agent if it made a misstep during the procedure. Backend gates help address this by doing things like:
Only give the agent the initial step. It can’t complete its full task without a backend request for the next step.
Don’t allow writing to the database without an access token.
Disallow writes that don’t have required data.
In combination, these form powerful gaurdrails to keep your agent on track.
Applying Backend Gates for Grocery Shopping
For my case, I wanted the grocery shopping procedure to be split into concrete tasks on smaller single-responsibility agents that can operate in parallel:
Item Resolution Agent
Receives the data for what stores to shop at, and what item needs to be searched for. Then it can:
Use the store’s API to search for the item
Collect the results
Hand them to the parent orchestrator
The agent would discard relevant results, not search thoroughly when it received lackluster results, or not write images.
Backend Gate
To address this, I now require it to write its results to the database in a transient database row (another default WordPress feature that majorly helps with AI infrastructure) with the list id, item id and shop cycle id. Now, when it writes its results, if it doesn’t satisfy the backend’s requirements, then it receives instructions on how to improve its results.
Writing the Selection
When the orchestrator writes the final selection, it was often discarding results or only writing the final selection instead of offering alternates. Or, capping alternates to 3 when there were really 10 valid alternates.
Backend Gate
To improve results, I added these backend gates:
Must include alternates array or pass a flag and reason there are no alternates
Must include images or a flag and reason why there are no images
Must include at least 3 items per store or flag and reason there are fewer than 3 per store
With how significant the improvements are, I highly recommend using server-side gates to improve agents’ reliability.
Over the past month, I’ve been building a WordPress site as a data-brain layer connected to Claude in a NanoClaw container. My goal is a plugin with a group of skills and endpoints that can:
meal plan,
build a grocery list
shop the list from multiple stores
add items to store cart(s)
Since starting the project, I’ve dramatically evolved my thoughts on the future of the UX of AI interfaces its practical applications to everyday life.
Why not Chat-only?
Chat is great for general information, but reviewing, updating, and finalizing a plan in chat is tedious and error prone. I started the plugin with a chat-powered approach but found myself in a mundane loop of things like:
“Remove red peppers. I already have Paper towels. I only need 1 pack of beef.”
Then re-review all its text output… again…
I knew I had to find a better way. How could I review the output more easily, provide quick edits to the output, and provide context to the agent quickly?
I started out thinking I was building a meal-planning and grocery-shopping tool. Now, I think I’m building an example of how agentic software should work: structured context, constrained abilities, and easy-to review and edit outputs
The result: an interface where the agent and I can build a list together. The agent gets you close, and the interface lets you quickly make adjustments.
A collaborative shopping list for you and the Agent
Plugin Overview
A meal-planning and weekly grocery list solution to make your life easier.
It uses WordPress as a context layer to provide an agent with all the data and abilities it needs to:
choose meals you’ll like
decide on grocery items you’ll need
shop from your preferred stores
1. Meal Planning
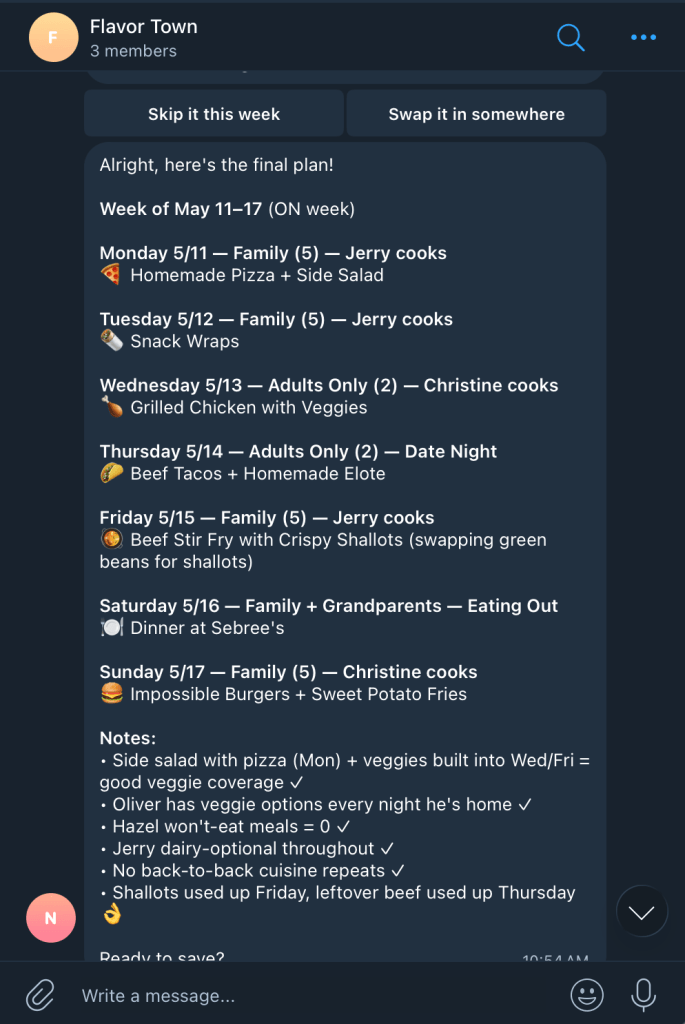
Start by asking the agent for a meal plan. I have my WordPress site managed in a NanoClaw container by Claude, and I interact with it via Telegram.
I ask it to build me a meal plan for the week, and the agent accesses my site to see what my family’s preferences are, what our schedule is, etc. Information is saved in WordPress post content and metadata.
It has examples from previous weeks, and a list of recipes we like (also WordPress posts, but it could be connected to any Recipe API).
List Building
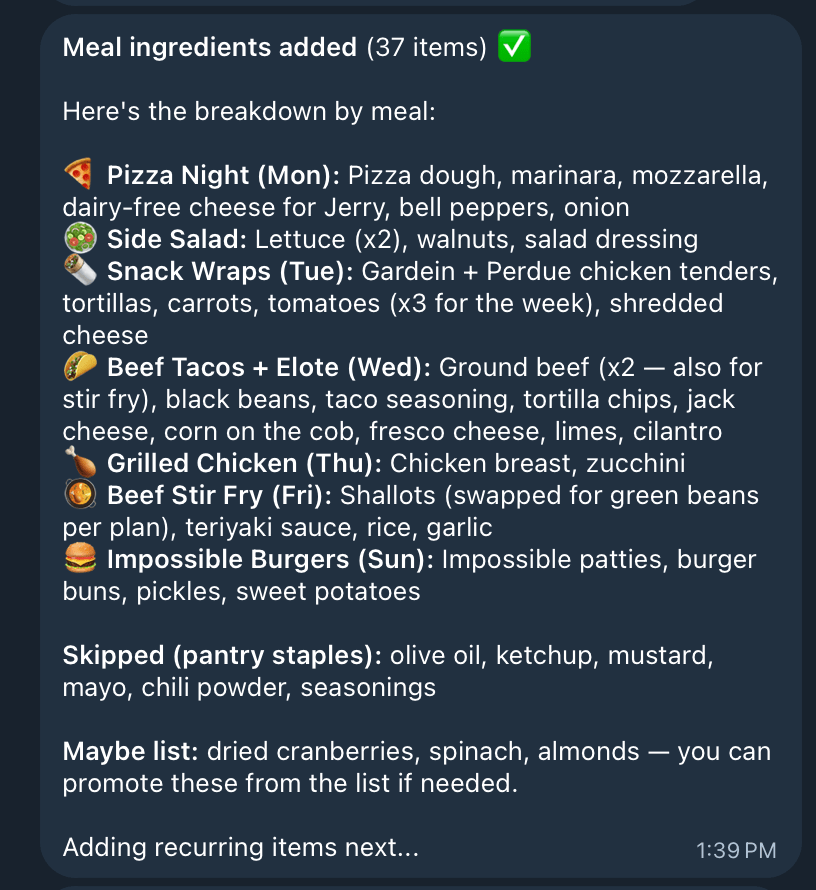
After the Meal Plan is set, it generates a grocery list off of the meals as well as checks my past orders for recurring items and household items.
This list gets saved as a WordPress post that polls for updates so the Agent and I can collaboratively build the grocery list.
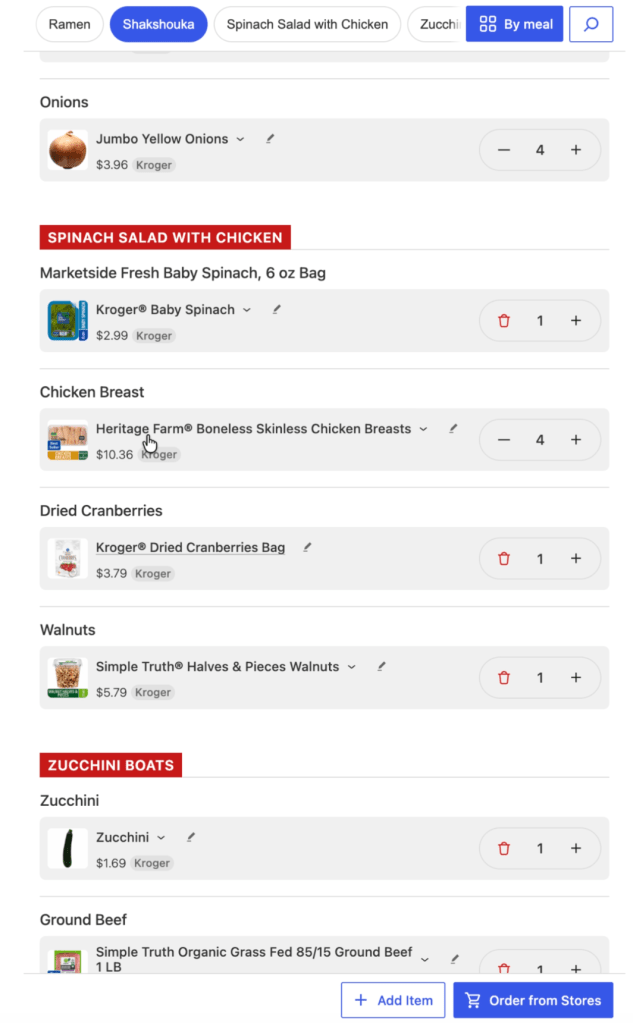
The UX layer has been really interesting. I’ve found I needed a quick way to fix AI’s mistakes and provide context. The AI gets me a rough draft, and I can quickly edit it for final approval.
The initial list created by the agent, ready for me to edit
You can:
edit item quantities
add items
delete items
choose which store(s) you want to shop at
add notes to an item for more context (“Buy organic if less than $1 more expensive than the cheapest option”)
filter the list by meal, aisle, store, or unshopped items
This UX layer is where I see the human layer of AI evolving very quickly in the coming years. There are not established patterns on how to interact with AI in the most useful way. Building this plugin is rapidly evolving my thoughts on the UX of AI beyond chat interfaces.
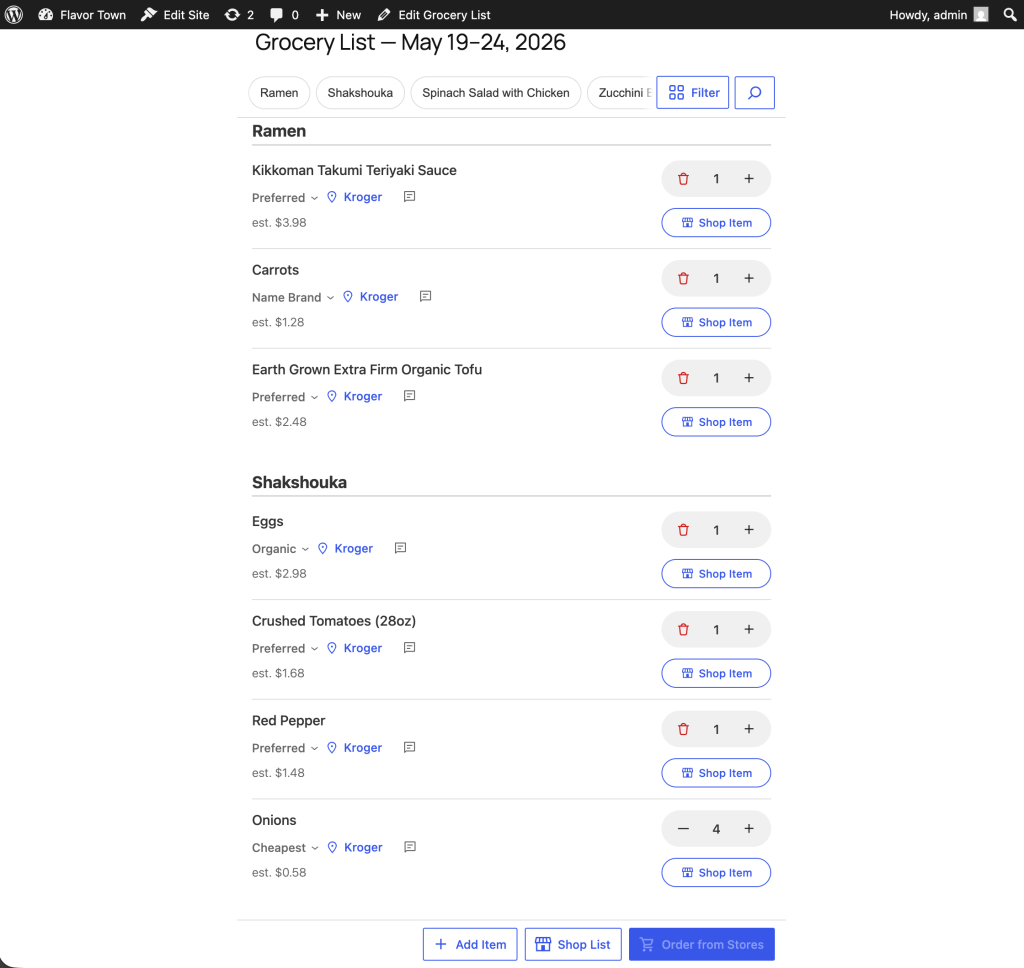
Grocery Shopping
After you have your list where you want it, you can have your agent shop the list for you, streaming its updates along the way.
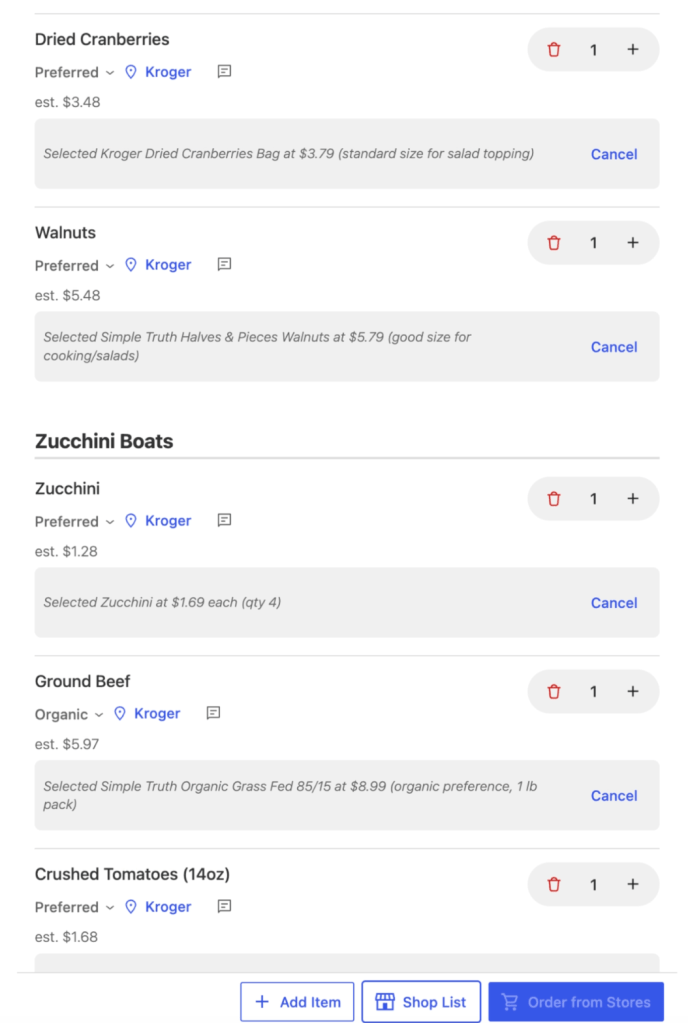
Once it has shopped your list, it returns the item titles, prices, images, and a quick-change dropdown to select an alternate related item.
Selecting an alternate item for Teriyaki.
The UX is all about quick fixes and edits to the agent. We know the agent isn’t right 100% of the time. It’s close, but not perfect. So, we let it get close, and provide a quick way to make it 100% right.
When you’re done, you can send the items to the stores you’ve selected.
How is the plugin useful?
It hits the perfect duo for usefulness:
Saves time
Saves money
Every week I do a meal plan and start from a blank slate. It doesn’t need to be that way. Now that my WordPress site has all my preferences, the agent can access that context and can get me a very solid start. It has taken an annoying task and gotten me to a finished meal plan in less time and with less annoyance. That’s win.
Same with building a shopping list. It knows all the items for a recipe. It can evaluate what I likely need and give me a chance to easily edit. Another win.
The really powerful thing is being able to shop multiple stores and build the best grocery store list for you. Imagine if you could ask the agent:
“Pick the store that has all the items for the cheapest total cost”
“Build me a grocery list with the cheapest items from each store”
“Prefer organic ingredients if they’re within 20% of the cost of the cheapest item”
It’s like having a personal grocery shopping assistant that knows you and your preferences, and gives you a quick way to review and fine tune the decisions.
Why WordPress?
WordPress provides a great foundation for building personal OS agents. The biggest issues with a system like OpenClaw is:
Security (whole computer access)
Difficult, technical setup
WordPress solves this with:
Secure container for your data
Easy server install
Plugin System for expanding agent skills
Agent Abilities API (in 7.0)
Consistent data structure
Custom API endpoints
Login/privacy layer
Plenty more 🙂
Building the Plugin on WordPress meant I got so many things “for free” and didn’t have to reinvent the wheel. It can be a containerized secure, online endpoint for me and an agent to work together on. It’s a perfect use case.
What’s Next
I’m still finalizing how this can get released. It may end up as a public WordPress plugin, or get run on WordPress.com’s agent abilities. We’re not sure yet. Follow along to find out 🙂
I just finished reading Code Simplicity, and, as someone who has a tendency for perfectionism, one thing that stood out to me was the idea of not worrying about building something perfect.
It’s OK to not aim for perfection on version one. Or any version. You don’t even know what perfection looks like at when first starting a project. Instead, aim for a simple solution to your current problem, not a perfect solution to a future problem that may never exist.
If you keep striving for simplicity with each new addition, your system will gain as much complexity as it needs, while still maintaining enough flexibility and simplicity for the next addition.
Since joining the hiring team at Automattic, I’ve been using the recruiting/hiring software Greenhouse to score Code Tests and evaluate trial candidates.
There are some things that have annoyed me a little about the site, so I wrote a few user scripts to improve my own time on Greenhouse.
A user script is JavaScript that runs on a site after it’s loaded. There’s a regex pattern matching to see what site you want to run the script on, and then you can add your own JavaScript code in to do whatever you want. 🙂
When you have a lot of text in a scorecard attribute, it won’t show you all of the content. The textarea is too small.
Before the user script.
So, to see the full overview of everything you have to manually drag the little corner handle to expand all the textareas. That can be a slow, repetitive task. So, I wrote a script to automatically expand all textareas to show the full content on page load.
After installing the user script, each textarea is expanded on load to show its full contents.
Much better! Now I can see the full overview as soon as I go to the page without needing to do any extra work.
Show/Hide Code Test Scorecard Sections
There isn’t a way in Greenhouse to have separate scorecards for individual stages of the hiring process. So, any attributes you have on your interview scorecard will also show up on your code test scorecard, and so on.
Our code test has a lot of individual attributes that are only applicable for the code test. This clutters your interview scorecard with a lot of things that are unnecessary for that stage.
I wrote a user script that will look for the string “Code Test” in the Interview Plan/Scorecard title. If the scorecard title matches “Code Test,” then it will only show scorecard sections with “Code Test” in their titles.
Code test scorecard after the user script
This majorly cleans up the clutter across all scorecards.
For most of my career I thought there was always something missing with how I debugged, like I needed to set-up an advanced error reporting system that would log and track down every error seamlessly. Then, I would really know how to debug like a 1337 haxor.
1337 haxor cam
Now that I have a big kid job, how has my debugging system evolved to be more professional?
It hasn’t.
The same things I did when I started, I still do. I still console.log things. I still var_dump or print_r() arrays to see what’s going on. Even in extremely complex codebases and systems, the same ideas work.
Debugging is Problem Solving
What I understand now is that console.log or var_dump isn’t debugging. Those are tools to help you debug. The real debugging happens with you.
You got this.
I don’t consciously go through this checklist, but this is the general idea of how I debug.
Recreate the bug.
Can you reliably reproduce the bug? If you don’t know what environments and situations it happens in, it’s extremely hard to debug. Is it a certain browser? A certain device? Does it happen consistently after a certain action?
Check your assumptions.
Is that variable really what I think it is? Does that function really return what I think it does? This is where I will console.log stuff, or code directly in the console to test basic functions and methods to make sure I really understand what does happen vs what is supposed to happen.
Isolate.
Reduce the scope of your issue to the tiniest bit of code you can. If you’re working on a complex CSS issue, how can you boil it down to the most basic test case possible?
If you’re not able to isolate the issue and reliably reproduce it, then you don’t really understand what the fix is. CodePen is great for helping with this, as you can isolate in a clean environment and then share results with your team.
Be persistent.
There’s nothing incredible or advanced about debugging. It’s just about being persistent to understand the root cause of the issue. Some bugs take a long time, but the more you poke and prod at it, the more you’ll understand it.
You’re Debugging. Not the Tools.
Remember, you’re the one doing the debugging. To put it all together, we’ve got:
Recreate the bug.
Check your assumptions.
Isolate.
Be persistent
We can easily remember this with RCIB, or BIRC, or hrmm.. CRIB? I bet you’ll be OK without an acronym, there are already enough things to remember.
The tools assist you, and can help guide you to the issue. In the end, you’re the one solving the problem, so use whatever tools you want to help you. 🙌
“If it looks like a duck, swims like a duck, and quacks like a duck, then it’s probably a duck.”
I recently worked on putting a plan together for improving the accessibility of a search component on WordPress.com. The existing interaction worked like a combobox where the focus was kept on the search input and you could navigate through the results with the down/up arrows.
The WordPress.com search suggestions component.
If It Looks Like a Duck, Swims Like a Duck, […], It’s Probably a Duck.
I looked at this input focus with arrow keyboard navigation and thought this should be marked up as a combobox.
A combobox is a semantically linked input with a list of options within a listbox
The interaction for a combobox is very similar to the interaction of the WordPress.com search suggestion component.
Focus remains on the input at all times
UP and DOWN arrows navigate between items
ENTER selects the item
As I considered it more, there were a couple differences in the behaviors:
A combobox should fill out the input with that text. So, selecting “Durian” from the options should fill out the input with “Durian.” In contrast, the WordPress.com search item selection would open a modal or go to a new page.
A listbox cannot contain interactive items. The WordPress.com search items were interactive <a> or <button> elements to open a modal or bring you to a new page.
In essence, it looked like a duck and it swam like duck, so I initially jumped to calling it duck. But, it didn’t quack like a duck. I incorrectly relied on a visual model to impact how I labelled it, instead of looking at its core purpose.
HTML Markup Should Not Rely On The Visual Representation Alone
I know this. I’ve written about it. But I initially didn’t take the extra time to take a step back and really consider what the core purpose of this component was and how it should be communicated via HTML. This was me, with as many good intentions as possible, being influenced by my own ableist, sighted-centric lens.
If I had implemented a combobox to improve the accessibility, I would have felt good since I had done so much work, while simultaneously not making a difference (or potentially making it worse) for assistive technology users.
Note I would have caught that it was a bad implementation for ATs, as I do test regularly with VoiceOver and/or NVDA while working. But I may not have caught it until after getting it to a working state and then needed to backtrack.
This Duck is a Search with Dynamic Results
The WordPress.com search suggestions component isn’t a combobox. It’s a miniature search with a <ul> list of dynamic results. The current plan on how to fix this is to:
Add a role="search" with an aria-label to the search form. This will reveal it as a landmark to ATs (Assistive Technologies).
Use speak() to announce when there are newly loaded results, loading, and error states.
Markup the search results as a <ul> with a heading when appropriate.
At times, there will be multiple <ul>s to group results. These results will be wrapped in a <div aria-label="Search Results"> in order to communicate the entire section as a group of results connected to the search input.
Remove the input DOM focus arrow key navigation. Search results will be TAB‘d to like normal links.
In the end, by considering what the component is and not how it looks, we are able to:
Significantly simplify the code
Reduce the weight of the JS
Communicate the search component appropriately to ATs
Save time over implementing a far more complicated (and not as successful) combobox
Remember to Keep Yourself in Check
If you are an able-bodied individual, it’s important to do the work to keep your perspective in check. Don’t say, “It looks like a duck, it’s probably a duck.” Take the time to consider a component’s purpose and how it will be communicated before moving forwards.
You’ll make mistakes (I certainly do). It’s OK. Keep listening, learning, and fighting the good fight. ♥️
Major props to Diego Haz for his help working through the best markup and interactions on the search component.
On my team at Automattic, we built the new Podcast Player block released in Jetpack 8.5 and on WordPress.com. This post is intended to give you a behind-the-scenes style look at all the little details that went into attempting to provide a good, accessible experience for everyone.
I’ll be focusing a lot on Screen Reader-specific considerations, using plenty of VoiceOver gifs and images.
To get started, here’s the block in action:
Episode 29: Dylan Field, Figma Co-founder, Talks Design, Digital Economy, and Remote Culture with Host Connie Yang –
Distributed, with Matt Mullenweg
The latest episode of the Distributed podcast pairs Dylan Field, Figma’s CEO and Co-founder, and guest host Connie Yang, Head of Payments Design at Stripe. Join a discussion on design, instilling remote culture, and the digital economy, including Field's perspective on the role of design in technology. “We’ve gone from a physical economy to a digital economy. I don’t think these are new trends or new things that happen but now, all of a sudden it happened all at once, and accelerated massively,” he says.More
Subscribe to Distributed at Pocket Casts, Apple Podcasts, Spotify, RSS, or wherever you like to listen.
I’ll break down each decision made related to accessibility:
Titles
Description
Playlist Markup
Communicating State
Feedback on Actions
One Title or Two?
At the top of the player we have two titles:
Track Title: 396 – This Day in Esoteric Political History
Podcast Title: 99% Invisible
Screen readers can navigate by headings. We could mark these up as two separate titles, but one heading would be immediately followed by another. Grouping them provides a heading that accurately describes the podcast player’s state: “[track title] – [podcast title]”
The link rotor on the Headings section provides a one-heading label to navigate to the player.
Positioning the Description
Although the description is visually placed underneath the player, it’s contextually related to the heading. A screen reader will follow the DOM, so this would end up being read as:
Player Title
Audio controls (play, slider, etc)
Track description
Semantically, it makes more sense for this to be arranged as:
Player Title
Track description
Audio controls (play, slider, etc)
So that’s how I structured the DOM. I write the HTML as the ideal semantic flow, then use CSS to match the design.
In this case, we’re using display: flex; with an order: 99; on the description to reposition it visually after the player. This isn’t ideal, as it can be bad to rearrange the visual part of the DOM when it’s related to focus order. In this case, I think it’ll be OK since the description isn’t focusable.
Playlist Context
The playlist is an <ol> with a list of <a role="button">s. Don’t worry, we used <a> with role="button" to provide a progressively enhanced player and implemented a SPACEBAR press to activate the button.
However, a list of buttons doesn’t provide a lot of context as to what those buttons are for. To address this, we’ve added a hidden <h3>Playlist: [podcast title]</h3> and paragraph description of the playlist and attached this as an aria-labelledby and aria-describedby on the <ol>.
Providing context to the playlist via `aria-labelledby`. Note the “Playlist: 99% Invisible, group”
Now when you enter the playlist, you’ll be told that you’re on a button in the context of “Playlist: [podcast title], group.”
Communicating State
I had originally marked up the track list as role="menu" with role="menuitemradio" to communicate the currently selected track. After I built and tested this, it turned out this was a bad idea.™
Basically, VoiceOver assumes that the menu is close-able, so it announces some extra information like, “Press escape to close this menu,” which isn’t accurate in our case. While the role="menu" and role="menuitemradio" seemed like a good choice according to WAI-ARIA specs, it wasn’t a good choice in practice.
After using the aria-labelledby and aria-describedby on the playlist <ol> to designate the list as a group, we can use aria-current to signify which item is currently selected.
Screen readers are supposed to announce the aria-current value, so aria-current-"track" should announce “[track title], current track, button.” In VoiceOver, it announces “[track title], current item, button.” Still pretty good.
Note the “current item” text in the gray box.
Playing: [Track title]
When the track is playing (not just selected), it will visually have a playing icon next to it.
Using an icon to indicate that the track is playing.
These icons did not have a title before, so even though there was an additional visual cue for the current track state, this was not accessible to a screen reader.
To address this, we added a visually hidden label so it will announce, “Playing: [track title], current item, button.”
It can be argued that this label is unnecessary since if it’s playing, you should be able to hear that the track is playing. But, what if you have your speakers off? What if you muted the player? By providing this additional label, we can make sure we’re doing all we can to communicate the current state of the player.
What just happened? Providing Feedback on Actions.
Loading
When a new track is selected, we use WordPress’s speak() function to immediately announce, “Loading: [track title] [track description].”
Before this, it would not give any kind of immediate feedback when you pressed a track button. Thus, if it took a long time for the track to load, you’d be sitting with silence not knowing if anything had happened.
Now, there’s immediate feedback that:
The track is loading
What track is loading
The track description (as it’s new content on the screen and would not be read otherwise)
Note: VoiceOver users can press ctrl to silence the message if they don’t want to hear the full description.
Playback Error
The visual error message has a link in it that says “Open in a new tab.” Screen readers can use the rotor to navigate links. When doing this, you are presented with an “Open in a new tab” link that doesn’t provide any context to what you’re opening in a new tab.
We’ve added a visually hidden podcast title in the link so it will show as “[podcast title]: Open in a new tab.” You can see this in the gif below in the bottom left gray box when the screen reader focuses the “Open in a new tab” link.
Open what in a new tab? “[track title]: Open in a new tab” provides context. The error is immediately announced as well.
Also, when an error occurs from not being able to load the track, we use speak() to immediately announce an assertive error message to inform the user an error has occurred. Without using speak() there would have been no feedback that an error had occurred.
Paused
While this one may not be 100% needed since there’s feedback from the track no longer playing, when I tested this out I felt like it was helpful to be overt about what just happened.
When pressing a button on a track that is currently playing, it will announce that the track is paused.
This uses speak() to announce “Paused” when the currently playing track button is pressed.
Final thoughts
Before I went down too many aria rabbit holes, I should have tried building a few sample markups and then tested them with a screen reader.
While writing this, I kept catching myself referring to these implementations as screen reader “enhancements,” but providing a good baseline experience for the way people interact with a website shouldn’t be an “enhancement.”
My brilliant co-worker, Haz Diego, mentioned that role="grid" would have worked well here in order to use the roving tabindex method (where you can tab to the list of tracks, but use arrow keys to navigate them) while still providing a generic grouped state for the playlist. I agree that this could have been a great option for this.
This implementation likely still has some issues, but I can promise that we did our best. If you have thoughts on how we could improve this, let me know in the comments or by opening an issue at the Jetpack Github repo.
But adding a click listener doesn’t make it accessible to people who use a keyboard or different kind of assistive technology.
To make our example accessible, we’ll need to:
Give a “focus indicator” to everything. A focus indicator is the little glowing outline to show you where you are on the page. Press the TAB key now, and you’ll get moved to the next “focusable element.”
Make everything that is clickable via a mouse be able to be “clicked” with a Spacebar or Enterkeypress.
Making Everything Focusable
To make this Terrible Idea™️ accessible, we’ll need to give everything an attribute of tabindex="0". This adds it to the “focus order” which makes it able to be focused.
Note: It is common for websites to not have any focus indicators. If you TAB through a site and it doesn’t show you where the focus is, then that is Bad.™️
To give everything a tabindex attribute, we need to:
Get all of the elements on the page.
Loop through each of the elements.
Add the tabindex attribute to each element.
Open your Console like we did in Part 1 (right click on the page -> Inspect -> Console tab). Now enter these lines in the console:
// Get all of the elements on the page.
var elements = document.querySelectorAll( 'body *' )

// Give each element a tabindex of 0.
elements.forEach( e => e.tabIndex = 0 )
Note: Lines starting with // are comments to help you out. You don’t need to type them. You can, but you don’t need to.
Now move focus back to the page (a “click” anywhere on this post will do). Press the TAB key a few times. You should have the focus moving between elements now.
Add a keydown Listener
In Part 1, we added a click listener. This made something happen each time we clicked on the page. We can “listen” for things other than click events as well.
To make something happen on a keypress, we add a keydown listener. As soon as a key is pressed, it will run our code.
// Set our phrase from Part 1
var phrase = 'Daddy eats fart popsicles'

// Add the Keydown Listener.
document.addEventListener( 'keydown', e => {
  // if our keypress is a Space or Enter key, change the phrase
  if( e.code === 'Space' || e.code === 'Enter' ) {
    e.preventDefault()
    e.target.innerHTML = phrase
  }
})
Play Around!
Now if you press TAB you should see the focus move to the next element. You can use Shift + TAB to move focus backwards. The highlighted focus indicator will show you the element you’re on.
Each time you press Enter or Space, your element should get its text changed to whatever the phrase equals.
What’s Next
Part 3 is coming up. We’ll go over two things that bring a ton of power to JavaScript: arrays and functions.
Be sure to follow me on Twitter or sign up to my email newsletter to find out when Part 3 is finished.
JavaScript is pretty fun. You don’t need to know much to start playing around with it. Let’s jump in with a Terrible Idea that You Should Never Do.™️
Note: This article is intended for beginners (and kids!), but has plenty of extra tidbits along the way. I’ll be intentionally glossing over most topics, but give you enough info to be dangerous. Read along, and have fun. 🙂
Daddy Eats Fart Popsicles
I asked my son what he’d think was funny to do to my website. He immediately said, “Change that title to ‘Daddy eats fart popsicles.’” So, I opened the Console, and we changed it.
To make it better, we added a way to change any text you clicked turn into “Daddy eats fart popsicles.” He clicked many more times than I would have liked.
This article shows you how to recreate this in a few steps.
Open the Console
Opening up the Console.
Right click on the page to open a menu. Select the option that says “Inspect” or “Inspect Element.” This will open a window with a bunch of HTML and CSS.
At the top of the new window, there’ll be a tab that says “Console.” Click that. Now we’re ready to have some fun with JavaScript.
Set a Variable
Setting the phrase variable in the console.
A variable is a way of remembering a value. Remember x in algebra? That’s a variable. We’re saying x means this other thing. In JavaScript there are three ways to define a variable, but we’ll just use one for now: var.
Click into the console, then:
Type or copy/paste var phrase = 'Daddy eats fart popsicles'
Press Enter to set the value.
Type phrase
Press Enter to see it return “Daddy eats fart popsicles”
If you get red error message after you press enter, something isn’t right. Check to make sure you typed everything exactly like in the example. A common issue is not including both single quotes ' around the text. Finding typos is approximately 75% of being a web developer.
When we say var phrase =, we’re saying that phrase is whatever comes after the =. It could be anything. You can also change what the variable equals.
Because phrase is already defined, we don’t need to type var before phrase. We only need to do that the first time.
Type or copy/paste phrase = 'My son eats fart popsicles'
Press Enter to set the value.
Type phrase
Press Enter to see it return “My son eats fart popsicles”
Clickity, Click
A webpage is made of a bunch of “elements” that together, form the DOM (I say it like “dawm” or the name “Don” but with an “m” at the end). We’ll make it so any element you click ends up saying whatever phrase equals.
In my son’s case, he reset it back to phrase = 'My daddy eats fart popsicles' 🙈
To make something happen when you click, we add an “Event Listener.” An Event Listener waits around for something to happen. It’s like a racer waiting for the signal to go. In our case, the signal is a click.
Setting the Click Listener
Go back to the console, then:
Type or copy/paste document.addEventListener( 'click', e => e.target.innerHTML = phrase )
Press Enter
BE CAREFUL BECAUSE YOU CAN NOW DESTROY THE PAGE (not permanently though, a reload will reset the page).
Pro tip: Press the up arrow key in the console to bring back your last commands, even after reloading the page. After a reset, keep pressing the up arrow until your initial var phrase line shows up. And if nothing is working, reload the page and try again!
I recommend clicking a title, or some content you don’t want to reread. Because after you click it, it isn’t coming back until you reload the page.
Event Listener Code, Explained
Let’s break down document.addEventListener( 'click', e => e.target.innerHTML = phrase ).
document: The entire page. The DOM we talked about earlier.
document.addEventListener: Add an event listener to the document. We’re adding it to the document, but we could add a click listener to any element of the page.
'click': There are several kinds of event listeners, such as an event when something changes, or when a key is pressed. Our code is saying we want to listen for a click.
e => e.target.innerHTML = phrase: e means “event.” We’re getting the target of the event (the target is the element that was clicked) and changing its text to whatever phrase equals.
Putting it All Together
If you’re getting stuck or things aren’t working, reload the page, then copy and paste this into the console:
var phrase = 'Daddy eats fart popsicles'

document.addEventListener( 'click', e => e.target.innerHTML = phrase )
A Mandatory Note on Accessibility
Accessibility (or a11y) means letting people interact with your website however they want to.
Maybe that means they have the ability to see and move their arms and hands around. If so, they probably use websites with their eyes to see and a mouse cursor to click on things.
Some people like using a keyboard and pressing the TAB button and arrow keys to move around the website. Some people use a Screen Reader that will read a webpage to them.
Either way, it doesn’t matter how a person interacts with your website. That’s for them to decide. But what you need to do is make sure people can interact with your website however they choose to.
That’s exactly what we’ll learn how to do next time.
Part 2 is in the Works
Subscribe to my email list below or follow me on Twitter to find out when I release Learning via Terrible Ideas: Replacing Text on Click, Part 2.
In 1917, the artist Michael Duchamp submitted his work, “Fountain” to an art exhibition. It’s a used urinal. And it stirred up yet another conversation about, “What is art?”
I’ve only taken one art history class, so forgive my simplification here. Essentially, art is subjective. If you personally don’t like Duchamp’s urinal, it doesn’t make it any less art.
JavaScript and CSS are the focus of most web designer/developer’s learning, but they’re subjective to the end user. There are better and worse ways to write your CSS and JS, but none are 100% right or wrong (as long as your page still works, is secure, etc).
HTML has clearly right and wrong ways to write it, and this is too often ignored. Here are several examples I’ve seen in the wild:
A “button” that’s actually a clickable <div> and not a <button>.
A “title” that’s actually a<div> and not a heading element (<h1>, <h2>, etc).
A “label” for an <input> that’s actually a <div>.
An “input” that’s actually a <div> with keydown listeners.
Notice a pattern? Looking at you, <div>. 👀
The essential issue is using a non-semantic element when a semantic element should have been used.
What Do We Mean by Semantic?
Semantic means that the element has a meaning. It says something about the content or its relationship to another thing. In HTML, basically anything that isn’t a <div> or <span> is semantic.
There’s also a continuum to what a tag tells us about the meaning of its content. For example, a <section> tells us less about its contents than an <article>.
<section> is still semantic, as it tells us that its contents should be considered as a group. But, an <article> tells its contents are grouped together and that it’s a cohesive article.
For more examples, I’ll walk through the Heading and Button elements to demonstrate how they are semantic.
Heading Elements
An <h1> is a title of a page, and an <h2> beneath it gives a hierarchy to the page.
<!-- h1, the most important part -->
<h1>The Importance of HTML</h1>
<!-- "What Do We Mean by Semantic?" is a subsection of "The Importance of HTML" -->
<h2>What Do We Mean by Semantic?</h2>
<!-- "Headings" is a subsection of "What Do We Mean by Semantic?" -->
<h3>Headings</h3>
Using an appropriate heading structure, you can automatically create a table of contents. Here’s how this article could be built into a table of contents just based off of the heading levels:
<h1>: The Importance of HTML
<h2>: What Do We Mean by Semantic?
<h3>: Headings
<h3>: Buttons
<h2>: Non-Semantic Elements
<h2>: Correct HTML Does Not Bring You Glory, But You Need to Do It
You can see the structure of the whole article being communicated just via the HTML. If I had used all <div>s, then the structure would look like:
<div>: The Importance of HTML
<div>: What Do We Mean by Semantic?
<div>: Headings
<div>: Buttons
<div>: Non-Semantic Elements
<div>: Correct HTML Does Not Bring You Glory, But You Need to Do It
There’s no meaning attached to the <div>, so it would be a flat structure. Just by using the correct HTML we bring clarity and structure to the DOM.
Buttons
A button submits or changes the state of something. By definition, it’s always:
focusable
activated on space bar or enter key presses
activated on mouse click.
When you make a <div> with a click listener, you’re not using the semantic interactions that come for free when you use a <button>. You have to manually build out the:
focus state
keyboard interactions
mouse interactions
Not only that, but when a screen reader comes to a <button>Submit</button>, it will use those semantics and announce, “Submit, button.”
The same thing using a <div> would look like:
<!-- Just kidding, I'm not going to make an accessible div button. -->
<!-- Use a <button> please! 😂-->
When we use semantic HTML elements, we elevate the content’s meaning. It gives the content life.
Non-Semantic Elements
<div>s and <span>s are non-semantic elements. The <div> does not give the content any additional meaning. It’s just a <div>.
I’m not being totally fair, as there is a tiny bit of meaning behind a <div> vs a <span>:
A <div> is a block-level element, as in, it should wrap things together.
A <span> is an inline element. It should be used within another element, like <p><span class="dropcap">I</span>nline elements</p>.
If there are no HTML elements that make sense for the content, then use a <div> or <span>. There’s 100% a place for <div>s and <span>s. Not every piece of content or HTML element needs additional semantics.
When writing HTML, use as specific of an element as makes sense for your content. If there’s nothing specific enough, then keep going for less and less meaningful tags. <div> and <span> are always the last choice.
Correct HTML Does Not Bring You Glory, But You Need to Do It
You’re not going to get a Webby Award or thousands of views on Codepen for how amazingly crafted your HTML is. You’ll need to be OK going unrecognized for your work. But know that every time I use a screen reader or keyboard on a site and it works correctly, I have a little spark of joy. I’m sure I’m not alone here.
In the end, you’ll have to be OK with knowing you did your best to make your work accessible to everyone.


![Playlist with current track highlighted and "[track title], current item, button, [podcast title], group" in the screen reader area.](https://jerryjones.dev/wp-content/uploads/2020/05/podcast-player-current-item-1.gif?w=1024)
![Navigating the buttons with the screen reader to see that the current track displays "Playing: [track title]"](https://jerryjones.dev/wp-content/uploads/2020/05/podcast-player-playing.gif?w=640)
![Screen reader showing "Loading: [track title] [track description]" when a new track is selected.](https://jerryjones.dev/wp-content/uploads/2020/05/podcast-player-loading.gif?w=640)